• Blog
    • Latest Posts
    • News
    • Featured Videos
    • Deals
  • About
  • Camera User Groups
    • ARRI
      • User Videos
      • News & Deals
      • Related Posts
    • Blackmagic
      • User Videos
      • News & Deals
      • Related Posts
    • Canon
      • Canon Cinema EOS
        • User Videos
        • News & Deals
        • Related Posts
      • Canon 5D Mark III/IV
        • User Videos
        • News & Deals
        • Related Posts
      • Canon Rebel/70D/80D
        • User Videos
        • News & Deals
        • Related Posts
    • Panasonic
      • Panasonic GH5
        • User Videos
        • News & Deals
        • Related Posts
      • Panasonic GH4
        • User Videos
        • News & Deals
        • Related Posts
      • Panasonic GH3
        • User Videos
        • News & Deals
        • Related Posts
    • Sony
      • Sony a7-Series
        • User Videos
        • News & Deals
        • Related Posts
      • Sony CineAlta
        • User Videos
        • News & Deals
        • Related Posts
      • Sony PXW-FS7
        • User Videos
        • News & Deals
        • Related Posts
      • Sony PXW-FS5
        • User Videos
        • News & Deals
        • Related Posts
      • Sony NEX-FS700
        • User Videos
        • News & Deals
        • Related Posts
      • Sony NEX-FS100
        • User Videos
        • News & Deals
        • Related Posts
      • Sony NEX-VG10/20/30
        • User Videos
        • News & Deals
        • Related Posts
    • Z CAM
      • User Videos
      • News & Deals
      • Related Posts
    • RigShots
  • VR
    • Daily Digest
    • Videos IN VR
    • Videos ON VR
    • Latest Posts
    • News & Deals
  • DOCOFILM
    • Newsletter
    • Latest News
    • Featured Videos
  • Essays on Film
  • Adobe Premiere Tips
Menu
  • Blog
    • Latest Posts
    • News
    • Featured Videos
    • Deals
  • About
  • Camera User Groups
    • ARRI
      • User Videos
      • News & Deals
      • Related Posts
    • Blackmagic
      • User Videos
      • News & Deals
      • Related Posts
    • Canon
      • Canon Cinema EOS
        • User Videos
        • News & Deals
        • Related Posts
      • Canon 5D Mark III/IV
        • User Videos
        • News & Deals
        • Related Posts
      • Canon Rebel/70D/80D
        • User Videos
        • News & Deals
        • Related Posts
    • Panasonic
      • Panasonic GH5
        • User Videos
        • News & Deals
        • Related Posts
      • Panasonic GH4
        • User Videos
        • News & Deals
        • Related Posts
      • Panasonic GH3
        • User Videos
        • News & Deals
        • Related Posts
    • Sony
      • Sony a7-Series
        • User Videos
        • News & Deals
        • Related Posts
      • Sony CineAlta
        • User Videos
        • News & Deals
        • Related Posts
      • Sony PXW-FS7
        • User Videos
        • News & Deals
        • Related Posts
      • Sony PXW-FS5
        • User Videos
        • News & Deals
        • Related Posts
      • Sony NEX-FS700
        • User Videos
        • News & Deals
        • Related Posts
      • Sony NEX-FS100
        • User Videos
        • News & Deals
        • Related Posts
      • Sony NEX-VG10/20/30
        • User Videos
        • News & Deals
        • Related Posts
    • Z CAM
      • User Videos
      • News & Deals
      • Related Posts
    • RigShots
  • VR
    • Daily Digest
    • Videos IN VR
    • Videos ON VR
    • Latest Posts
    • News & Deals
  • DOCOFILM
    • Newsletter
    • Latest News
    • Featured Videos
  • Essays on Film
  • Adobe Premiere Tips

Category: FocusPulling Original

27 April 2023

DJI RS 3: Essential accessories for the best all-around gimbal stabilizer

Written by Paul Moon

I’ve got a long history with motorized gimbals, dating back to the earliest prototypes with mere 2-axis stabilization, onward to the first 3-axis pistol-grip Filmpower Nebula 4000, then the stronger CAME-Single, Zhiyun’s downslung Weebill LAB, and even a miniature one that I customized to fly a virtual reality camera. Until last year, I had settled into the DJI brand with their modest and portable Ronin-SC, but when it broke down, I upgraded to their RS 3.  Simply put, it’s a foregone conclusion to me now that the RS 3 is hands-down the best gimbal stabilizer on the market, so long as you’re not trying to fly a bulky cinema camera…but, what would be the point of that?  Most of us by now have added a portable B-camera (or C-camera, etc.) to our kit, to complement our bulky A-camera, at about the same image quality but much more portable.  For example, my Sony FX30 shoots video quality equivalent to (and easily blended with) my bigger Sony cinema cameras.  If I’m going to fly on a gimbal, it’ll be whatever’s lightest, which always results in better composition and camera movement.  Much as I loathe Sony’s attitude and price-gouging, their touchscreen- and A.I.-driven autofocus has magically simplified steadicam shoots:  there’s no longer any need for big rigs with focuspulling gears and motors and remotes.

What’s the magic reason why the RS 3 wins above all?  Mainly, this:

PGYTECH Carrying Case & Handgrip Mount

In my above YouTube Short (the only kind I can manage to spend time making these days!), I’m showing you how, when you power down the RS 3, it instantly tucks into a closed position and automatically locks all three axes.  It might seem like a gimmick, but that overused adage applies:  “it’s a real game-changer.”  When you’re quickly packing up and moving from one location to the next, keeping your camera mounted so that it doesn’t lose its delicate balance, the last thing you want is your camera and all three axes flopping around in transit.  Yes, on some but not all gimbals, you could manually lock each axis, but that’s wasted time, repeating those steps all day long, and your time’s better spent being efficient, not missing the shot (nor the sunlight, during a shoot when time is always the enemy — invaluable during my latest music video project shot entirely on the RS 3 with an FX30).

There are lots of other comparative wins for the RS 3 too, but again, it’s really a foregone conclusion here:  that there’s no other choice for mirrorless and DSLR cameras.  (DJI’s RS 2 offers slightly more weight capacity, but lacks the marquee Automated Axis Locks feature — sadly, same for the new RS 3 Mini.)  So, the main point of this post is to share a few absolutely essential (and strangely overlooked) must-have accessories for anyone who owns the RS 3.

PGYTECH CARRYING CASE

A frustrating development in this whole industry, is that manufacturers are “cheaping out” on giving us storage cases to protect our gear.  It used to (and still does) make lots of sense:  after designing the product themselves, they’re in the best position at product launch to simply bundle a perfectly-fitting case or bag — which can have the nice side effect of protecting their fragile products and reducing warranty claims.  Before these multinational corporations got more greedy, this was another kind of foregone conclusion.  Now, they aren’t even interested in the smaller profit margins from separately selling us a custom case or bag, even though they’re in the best position to market one.  Boo on them.

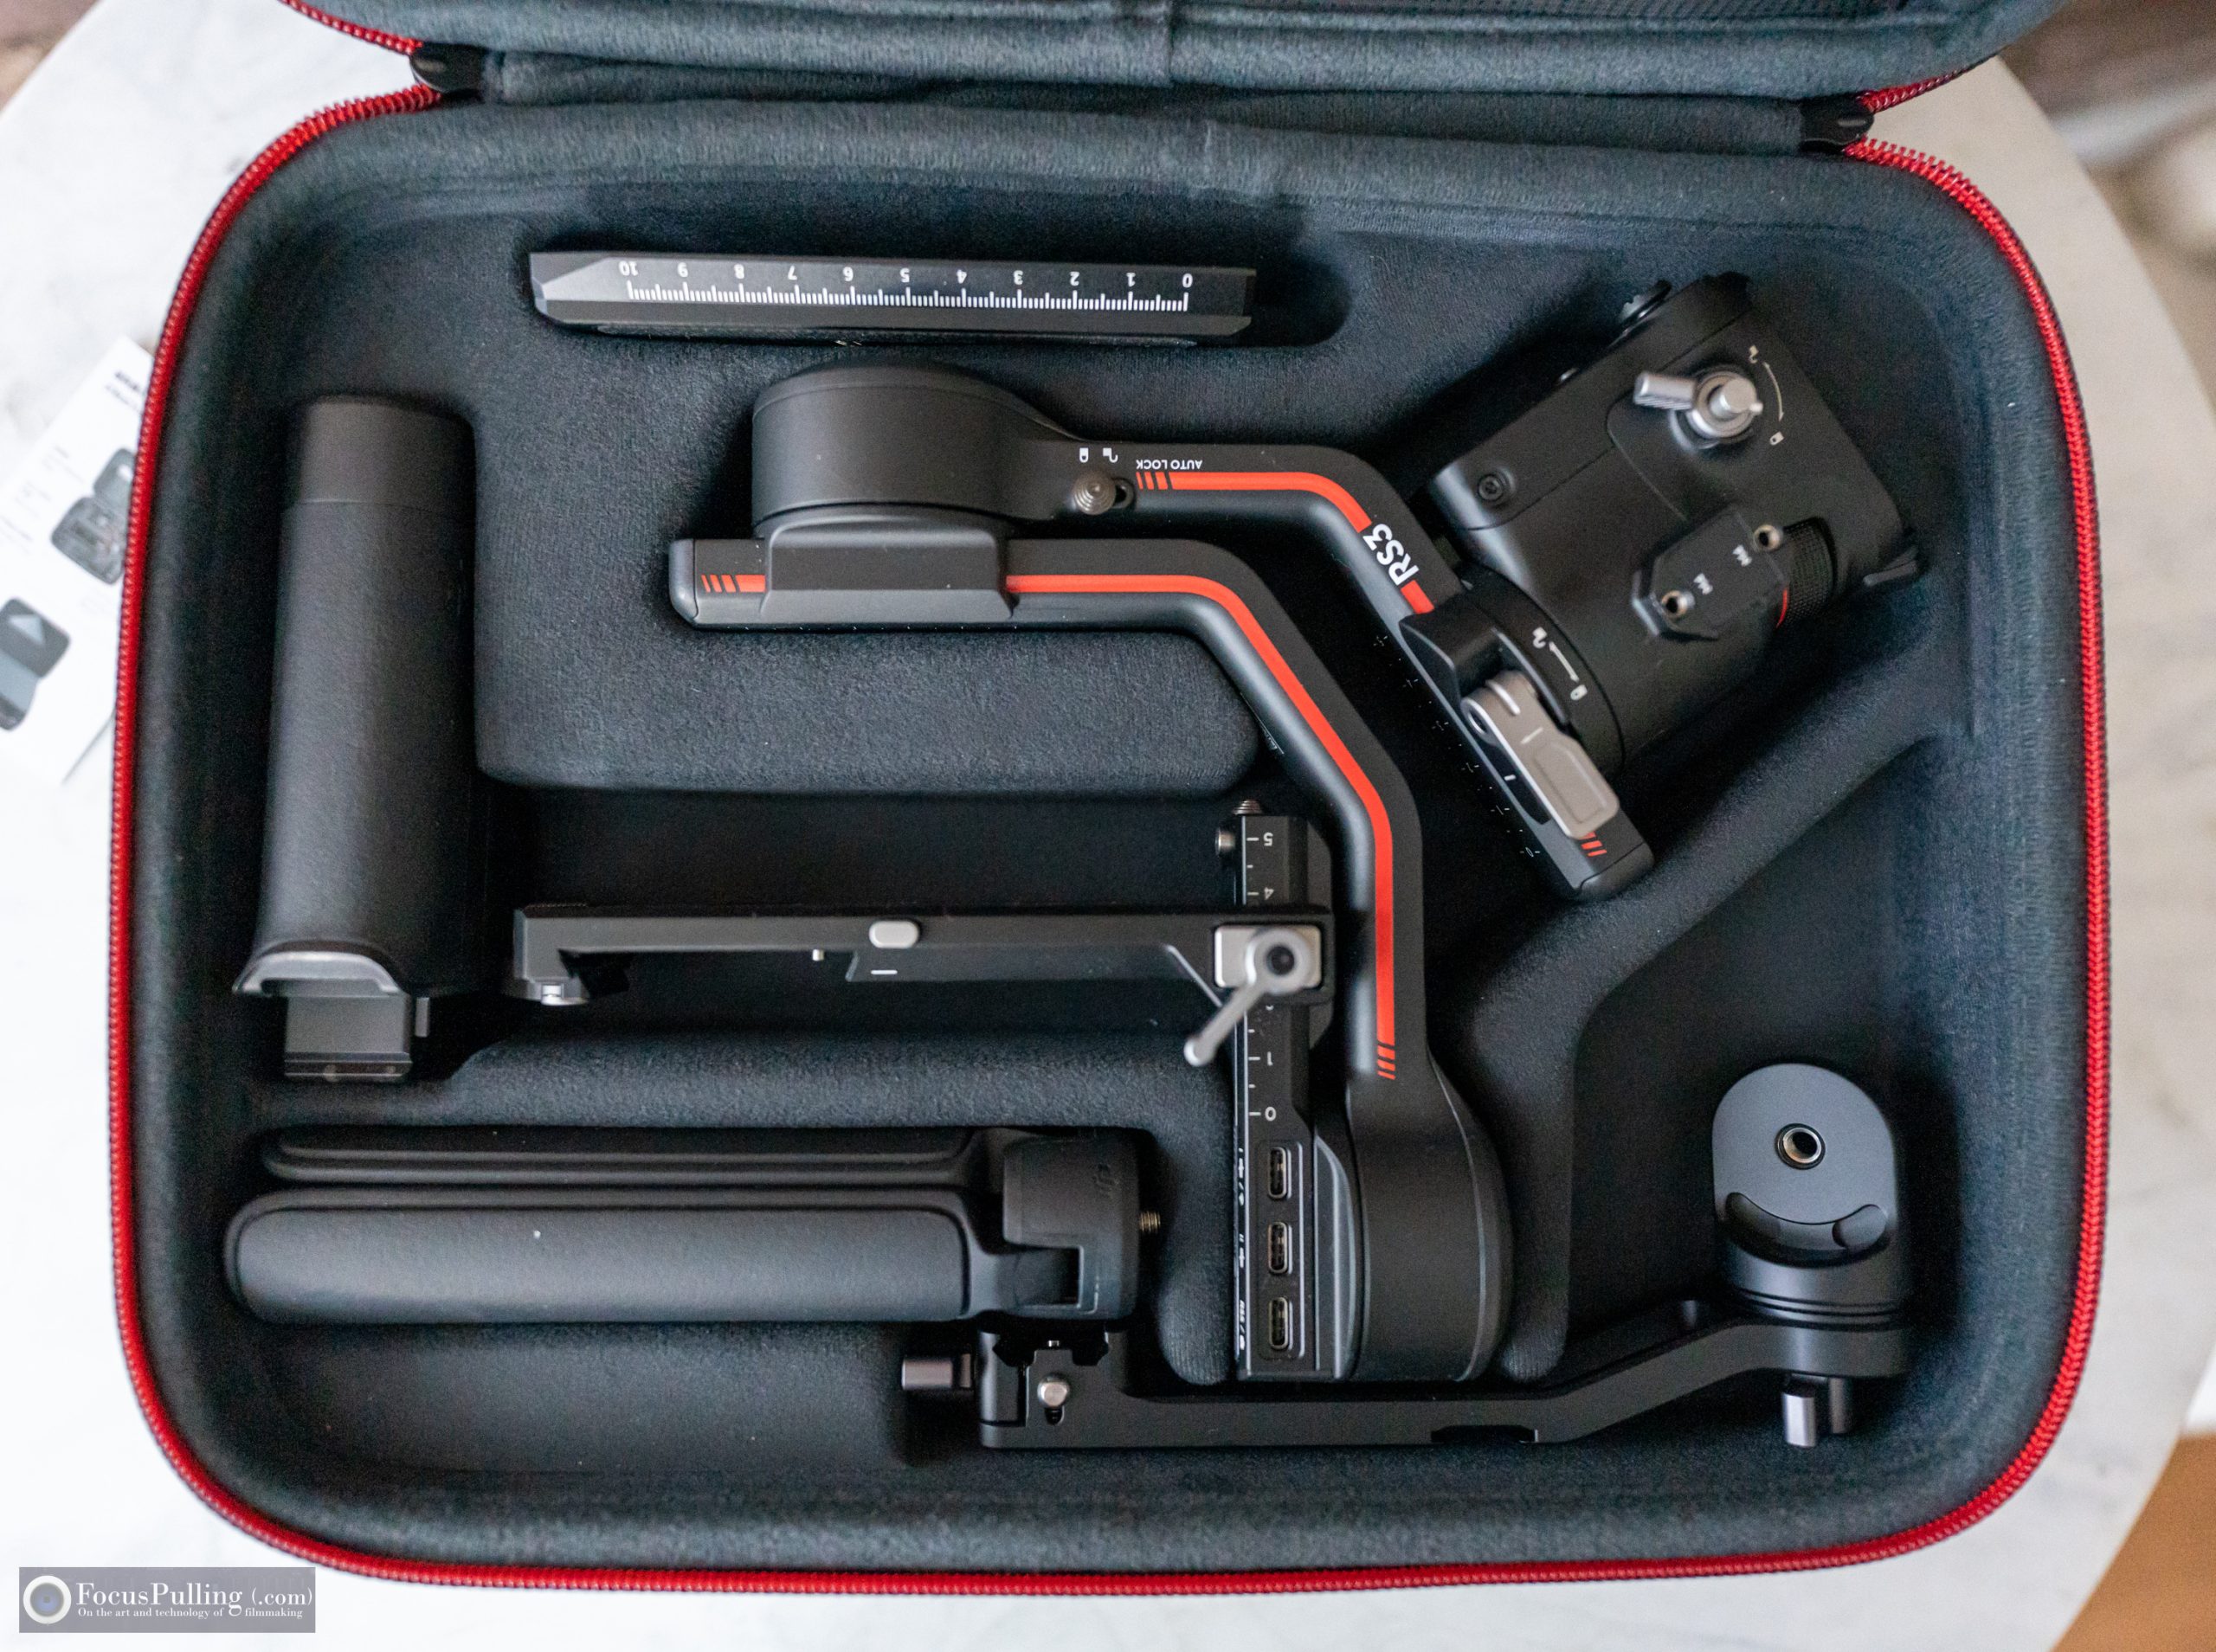
Enter PGYTECH, one of today’s most exciting third-party accessory-makers in this space, at a quality level well above companies like SmallRig.  They did everything right in the above-pictured case, and while there’s not much competition, another third-party case (sold under numerous different names) has a fatal flaw:  you need to un-calibrate your RS 3 by sliding all those carefully balanced measurements down to minimum size before being able to fit it into their case that they boast has “precise molding” — not a good thing.  As seen in the above middle picture, PGYTECH leaves just enough room for various configurations, while keeping everything snug.  PGYTECH also provides room for all the original accessories, along with their extra handgrip mount (discussed below), and anything else you can fit into the further pockets seen above at right, including pockets for small accessories, and a divider sleeve for a tablet or small laptop.

Best of all, it’s the most affordable of all the options, well under $50, especially when you use coupon code FOCUSPULLING for 10% off at this link direct from PGYTECH.

PGYTECH HANDGRIP MOUNT

One of the key innovations way back when Zhiyun launched their Weebill product line, was an additional rear handle for another point of contact, and for “underslinging” the stabilizer lower to the ground.  My review didn’t find it revolutionary, just occasionally useful, but I eventually didn’t like it being completely integrated into the design, making the total size bigger and heavier always.  DJI offers an oddly-named “briefcase handle” for their RS series that folds out, but you’d still never want to keep it mounted all the time.  I prefer the flexibility of PGYTECH’s Handgrip Mount product, which uses a quick release connection to the NATO rail-like connector already on the RS 3, including a smart safety latch for insurance.  Then, they let you decide whether to move the tripod handle from the base to screw into the 1/4″-20 mount hole on the Handgrip Mount, or to buy another handle — I simply repurposed the one that came with my broken Ronin-SC.  But you could buy anything, and it of course doesn’t need the tripod function there.  (I sprung for grippy leather on the Weebill years ago.)

This is a similarly affordable accessory, and much less that the worse DJI option, being well under $40, especially when you again use coupon code FOCUSPULLING for 10% off at this link direct from PGYTECH.

SMALLRIG QUICK RELEASE MANFROTTO PLATE

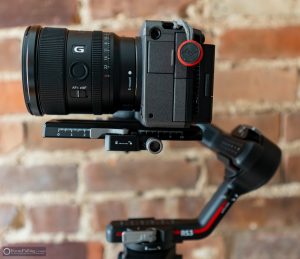
I’m usually not a fan of SmallRig, because of their clownface branding and their grabby pricing lately, but after scouring for alternatives, I couldn’t avoid their quick release plate designed for the RS 3.  I even gave ANDYCINE a shot with theirs, but annoyingly, it claimed compatibility with the RS 3 but literally didn’t fit.  Here’s why this accessory is so important:  the quick-release system that DJI includes with the RS 3 is one goofy and needless combination of a Manfrotto 501-adjacent forward/backward quick release plate, and a second smaller left/right plate, that ultimately elevates your camera height.  Raising the center of gravity on a gimbal is easily the stupidest thing to do when it’s unnecessary.  But as seen in the above pictures, you can use this accessory as a replacement for both, skipping the extra height and extra plate; and the added bonus is that, compared to the DJI base plate, it’s fully compatible with most standard Manfrotto 501/701 quick release tripod heads.  It also has that other key feature of the RS 3 that distinguishes it from the rest:  you can use the knob pictured above at right, to engage the gears at the bottom of the plate to fine-tune the forward/backward axis balance.  Simplicity without compromise!  Always a winner.  This is what DJI should have included with the RS 3.

PGYTECH ONEMO BACKPACK

It might not seem like a clear fit for the DJI RS 3, especially when focusing on accessory products, but this incredible backpack design includes a feature that is a godsend for steadicam work.  To begin with, PGYTECH went straight down the line and engineered a camera backpack design that incorporates all the best features found in competing brands like Peak Design, and added more.  It also reminds me of my favorite “onebag” choice for general travel luggage, the Aer TravelPack 3.  (I’ll later be reviewing and comparing this with PGYTECH’s newest, larger update, their OneMo 2.)  Much like the RS 3 case, it has minimalist design without garish branding like you’d find on other third-party products, and its material design is durable/sleek.  Even though the dedicated case is ideal for travel and storage, the OneMo offers this feature that’s brilliant for temporarily stashing a fully assembled and calibrated gimbal like the RS 3:  the expandable compartment seen below.

Into a sort of V-shape seen from the side, you can unzip a top expansion and then another zipped opening into which you can set a fully assembled gimbal stabilizer like the RS 3.  The importance of this is massive, because otherwise, making room for such an odd form factor in the main compartment of any backpack would waste space, or become impracticable.  So long as you don’t bang your back against anything (!), a temporary stow into this expansion compartment, when moving from one place to the next, is a huge time-saver.  And remember, with those Automated Axis Locks, your gimbal isn’t flopping around in there.  You’ll probably have to dismount your camera via its quick release plate, but then PGYTECH has you covered in the main compartment, including a separate dedicated camera case that you can also access from side compartments as seen below.

There’s even a clever battery storage system where each of the velcro closure straps has a slider you can use to identify which ones are going on empty, and which are fresh.  Getting a durable, productive, and attractive backpack like this is an investment that pays for itself over time, and PGYTECH has priced their OneMo line much lower than competitors like Peak Design (because lattes and avocado toast cost a lot in the SF Bay Area!). Again, when you use coupon code FOCUSPULLING, that 10% discount really shaves a lot off already affordable price points at this direct link.

I think that covers it all!  But let me know if there’s something else in the RS 3 world worth mentioning, and I’ll be excited to share.  (Myself, I’m keeping an eye on the new Tilta Basic Ring Grip, along with the new MOVCAM FlexPro.)  This kit has really revolutionized how I shoot, with freedom of movement and lots of saved time.  We’ve come a long way since the Merlin.

April 27, 2023 FocusPulling Original Leave a Comment
25 March 2023

Aputure Amaran 200x S Bi-Color Light, Aputure Lantern, Impact Combo Boom Stand & Ruggard Bag

Written by Paul Moon

It’s hard to keep up with the portable continuous light industry, as they launch brighter outputs, lower price points, more versatility, and in the case of Aputure’s new Amaran 200x S, better color accuracy (and slightly higher output at the indoor color temperature) compared to their preceding budget workhorse 200x (without the S).  We’ve lately seen novice-brand companies like SmallRig and Zhiyun try to enter the game, but their products fall short.  I’ve previously at this blog reviewed, besides Aputure’s ultra-portable lights and tubes, Sokani monolights starting with their X60 RGB full-color-spectrum model, and then their brighter X100 bi-color model, paired with suggested accessories that pragmatically combine into an ideal full-service lighting kit for creators on a budget.  In that spirit, let’s do the same for the new Amaran, which outperforms them all for a still-reasonable $349 USD.

So, what’s new about the 200x S (like, what does that -S suffix mean compared to the prior 200x)? One gets the impression, it’s best kept simply explained, sparing the engineering details: that you get “an 18.6% increase in SSI from its predecessor,” which is a rating of color accuracy and a fuller metric than the CRI we most often see on cheaper products. The upgraded “dual-blue LED chipset” seen at left makes the light that it produces closer to reality than usual for LED lights, compared to authentic daylight (outdoor) or tungsten (traditional indoor) color sources. In the real world, this mainly translates into more believable skin tones, instead of getting creepy shades of greens, oranges and blues. One additional feature of the new LED chipset is slightly higher luminance (brightness) at the lower (indoor) color temperature compared to the prior 200x without the -S, while actually drawing a little less power too.

Speaking of color temperature, another thing worth mentioning is the overall future of artificial lighting (a term used in contrast to “practical” lighting which includes natural sources like the sun, or existing sources like table lamps using standard light bulbs).  I was at CineGear Expo a few weeks ago and chatted with an Aputure rep about how their RGB LED light panels, such as the new P60c seen at right, includes a hue dial mode in addition to the CCT color temperature dial mode.  In other words, even for the purpose of only achieving accurate white balance, rather than splashing the whole rainbow spectrum of theatrical lighting, it is inevitable someday that all lighting kits should give us the power to tweak/bias hue too.  We all know this from the experience of color grading for white balance in NLE applications like Adobe Premiere:  there’s a slider for Temperature (between blue and orange), and a slider for Tint (between green and red).  Taking just one example:  if I’m trying to achieve accurate white balance, but my subject’s skin is surrounded by green vegetation/leaves, a bi-color monolight like the 200x S won’t be enough — and shifting the hue into the red direction, away from green, would become priceless if possible.  But as I discovered from the Sokani X60 RGB monolight, the full color spectrum capability comes at the expense of luminance/output power, and CCT accuracy.  It’s currently a trade-off.  What this 200x S delivers, then, is maximum power at the typical drawback of sticking to the workhorse CCT spectrum only — and it could be worse, when using the sibling 200d S, which limits you to daylight color temperature only.

200 watts is indeed a lot of power (that’s what the 200x stands for — you can get a 100x S for a hundred bucks less, if you’re pinching pennies, though double the brightness latitude at that same size seems worth it to me, since you can always dial down the brightness, as seen in the above pictures that show one dial for CCT or color temperature, and the other for INT or intensity). So unless you want to haul around an unwieldy gigantic battery module, you’re going to need an AC wall outlet.  Compared to most other monolights, I really like how Aputure designed a bright yellow, solid connector interface angled to where you’re reaching up, adjacent to a similarly angled power toggle. As seen in the picture at right, I also like how the external power supply includes a metallic loop that you can use to sling onto the stand, in case cables don’t fully reach the ground, etc.  On the back panel display, it couldn’t be simpler:  you get the intensity percentage, and the color temperature in Kelvin, with a Bluetooth logo indicating connection to Aputure’s free Sidius Link app that you can download for free to Android or iOS smartphones/tablets.  (But, ugh: note to engineers, we search for apps alphabetically on our phones, so please for the love of God just start off app names with your company names!  Why should I remember the word “Sidius” in a sea of hundreds of apps?)

Another nice touch is the way that the included power cord that runs from the brick transformer, to an AC wall outlet, locks in with a red tab/switch (just like the power cord into the light locks into its yellow receptacle), ensuring that nothing yanks loose during a shoot.  Unfortunately though, compared to the Sokani products and many others, Aputure does not include any bag to carry these several accessories.  Worse, they don’t sell one or recommend one, thus you’re on your own finding something that carries the monolight, power supply, and detached Bowens-mount “Hyper Reflector” which kicks up the output from 6400 lux to 45,400 lux.

But that reflector casts a harsh circle around your target (even more than the prior Amaran product pairings), so for almost all use cases — to avoid a stark corporate video look — you’re going to need a modifier with difffusion.  I’ve got a winning favorite that I’ve touted before:  the Aputure Lantern which is a bargain at $89 USD.

This type of attachment is usually called a “China ball” on movie sets (a political incorrectness that actually just makes me giggle), not always the first choice for conventional lighting kits.  They’re most classically used for overhead lighting above a roundtable discussion — one great example, exposed in many shots, is the restaurant setting in Martin Scorsese’s Netflix series Pretend It’s a City with Fran Liebowitz.  But as a practical compromise, it casts a very diffuse and broad glow that minimizes shadows, compared to your next-best option such as the Aputure Light Dome Mini II which sacrifices maximum softness for a stronger and more directed cast.  And it still can mount facing forward, as seen above, casting a wide berth.  The Lantern instantly sets up and breaks down: you just latch one center support loop into a hook that you can see when peeking down into the bottom (in the picture at right), and those pre-installed “ribs” on the sides just warp into position. It literally takes about 5 seconds, and when collapsed, it’s nice and small, and packs into its included carrying case seen below, which in turn can fit into a bag for everything that includes a light stand.

Since portability and low cost is what distinguishes these products, I found a match in the perfect lighting stand for it, manufactured by Impact and sold for as little as $100 USD. Its best feature is that it combines light stand with boom, and a mounting hole at the end so you can attach a counterweight. Impact includes a saddle bag that you can throw anything into for adding weight, such as other batteries you brought with you, or bottles of water that you’ll be drinking when you pack up anyway.

The stand has a big knob to tighten the angle that doesn’t slip, and its magic trick is that the boom arm telescopes down into the vertical light stand! So you can skip the boom part if you don’t need it, and the stand adapter at the end can point straight up.

It’s reasonably small at 45 inches collapsed, but it can get up to 13 feet. For packing everything up but keeping to a low budget, there’s also a great padded bag that fits the stand perfectly from Ruggard costing under $60 USD, way below anything else I could find. It’s perfect for holding the light stand, and also the diffuser that we’ve added to this kit.

But if you don’t need the boom arm and rock-stability of the Impact stand, and want something super light and portable, then after a lot of research and experimentation, I’ve settled on the Kupo Handy Stand for $60 USD, which folds down to an amazingly short 19.2 inches but extends to a maximum height of 89.3 inches.  You might find your light swaying around nervously when you bump it, but so long as you spread the legs out fully horizontally, and point one of them in the same direction as your light, it should hold up!  And then, you’d best get a smaller version of the Ruggard bag to match the smaller stand.

March 25, 2023 FocusPulling Original Leave a Comment
10 January 2023

Zoom M3 MicTrak Stereo Shotgun Microphone/Recorder Review

Written by Paul Moon

Zoom has almost singularly started a revolution in audio recording for productions, especially at concerts and events when you don’t have time to worry about audio levels because you’ve got enough to worry about in the camera department.  When I bought the Zoom F6, their 32-bit float six-channel audio recorder, everything changed.  It’s solidly built in a metal chassis, has versatile power options, performs well with high-quality pre-amps, and best of all lets you set-and-forget audio levels because of its 32-bit float recording (no peak clipping, no hiss when boosting attenuated sources) onto up to six discrete tracks.

Now I want 32-bit float audio recording in everything, and when RØDE eventually gets into the game (e.g., when their Wireless GO series finally natively records 32-bit float instead of merely upscaling at output), I’m all-in.  So with that enthusiasm, when Zoom itself announced its M2, M3 and M4 MicTrak series of products, I ordered without hesitation the one that I estimated would suit my needs best:  the M3, which is a camera-mounted stereo shotgun microphone that can record internally in 32-bit float besides also outputting conventionally to a camera’s stereo microphone input.

You can see it here mounted on top of my Sony FX30, a great pairing in scale and application.  From the top view, you can see a three-position stereo mode selector:  besides choosing OFF to maximize hypercardioid directionality in monaural sound, you can choose 90° for a narrow stereo image, or 180° for an expansive stereo image.  Even better, this in-the-field decision can also be decided later using Zoom’s proprietary desktop computer software that lets you select between combinations of multiple tracks recorded onto the inserted micro-SD card in 32-bit float multichannel format.  You’ll see that besides a power button, there’s also a high-pass filter (cuts lowest frequencies such as rumbles as some wind noise), as well as a red button to start/stop recording, and a playback control to start/stop only the most recent clip recorded.

On one side of the M3, you can see a 1/8″ stereo headphone jack, with an associated volume rocker, and on the other side, there’s an 1/8″ stereo output for the included coiled cable to plug into your camera’s 1/8″ stereo microphone input, if you want to record the microphone’s pickup into your camera’s video recording.  Ironically, even if that quality would improve upon any camera’s internal microphones, I actually choose to leave the M3 unplugged, forcing the camera to record audio using its internal microphones as a foolproof scratch audio backup, ensuring something to sync with.  After all, the differentiating point of this product is to record better, 32-bit float audio onto a micro-SD card inside the microphone, and that will later need to sync with (but also replace) lower-quality audio from somewhere.  If something goes wrong with that coiled cable connection running in parallel from the same source (such as settings buried deep in cryptic camera menus), better to have something to sync to, than nothing at all.  Note that there’s also a USB-C port:  you can offload files from the micro-SD card this way (slower than a card reader), but it also accepts a power source for longer recording time (beyond an already generous 12 hours from a pair of AA alkalines).

The Zoom M3 comes with a just-alright typical foam windscreen, but you can buy a deadcat already designed for, e.g., the RØDE VideoMic NTG, that will fight hardest against severe wind.  Overall, the product seemed like another winner to me, until…

Yikes indeed.  Despite being the earliest adopter, before trying out my M3, I started seeing reports like the above of really big flaws, and the common theme was:  Zoom’s simply going cheap on us.  Whether it’s their big “boo-hoo” about pandemic inflation/supply chain issues, or just arrogance, I should have known from the moment I got the package:  for the first time, it arrived in plain cardboard with simple black lettering and no pictures.  The above “YouTuber” (ugh) notes the severe/abnormal handling noise afflicting the M2 and M4 that are literally built for hand-holding (oopsie!), as well as incredibly vulnerable RF shielding:  basically, these damn things pick up every possible amount of radio frequency interference from stuff you don’t even own or have nearby.  And this is not a case of “exceptions make the rule.”

But for my own tests, let’s start with the shock mount.  Simply put, it’s a far cry from Rycote.  Embedded at the top of this post, you’ll find my audio-only upload to YouTube that speaks for itself.  In quick summary here, basically this mic will pick up on any buttons and dials that you lightly touch on your camera.  Not good.

And worst of all, there’s the stunningly poor RF shielding.  Another bad sign, yet it seems like a good thing at first:  the M3 is ultra-lightweight plastic.  That makes it easier to carry around, but without proper shielding, it means you’ll be severely compromising the reliability of your recordings with random interference in very many typical recording environments.  Granted, my recording was in busy downtown Manhattan, but:  isn’t that a fairly typical production environment?  And notably, I’ve never had any shotgun microphone pick up on noise like this, ranging from my similar plastic RØDE VideoMic NTG, to my reference-standard Senn MKH 416.  Bear in mind, the target market for people to buy this product, are those who want higher-quality, higher-performing sound quality at 32-bit float compared to the poor performance of low-grade 16-bit stereo pre-amps built into typical cameras at their microphone inputs.

In my recording here, I demonstrate how with absolutely no devices turned on in my studio, and just by wandering over to my window, I’m picking up on AM or FM broadcast radio that rises to a stunningly high noise floor.  Basically, it’s some pop music station with shock jock DJs squealing over whatever else you’re recording through the microphone (in the case of my test, total silence around the microphone).  Great!

Zoom is too gigantic and foreign of a corporation to meaningfully address this gigantic blunder.  They will deflect if at all, declaring that “this product is designed for entry-level filmmakers who want all the latest features at a price they can afford,” but let’s not be fooled.  Zoom’s engineers were completely aware of this worst-in-class severe interference, but their company estimated that you’re too stupid to care (or, enough of an impulse buyer to compromise).  In hindsight, I’m not surprised:  for two years or so, I’ve been back and forth with Zoom about a flimsy plastic washer on the top-mount bracket of their F6 that constantly gets stuck after tightening into the 1/4″-20 screw-hole on a camera base.  The solution was simple:  just use a metal washer, dummies!  They’ve repeatedly deflected and waffled on their promises to fix it — so simple, and so dumb.

In all matters of creative enterprise, the credo prevails:  never assume your audience is stupid.  Let’s stay away from Zoom until they literally (and figuratively) clean up their noise.


January 10, 2023 FocusPulling Original, FocusPulling Original Video 9 Comments
← Older posts
Newer posts →

Recent Posts

  • PGYTECH OneGo 2 Backpack Review
  • DJI Osmo 360 | touring Washington DC
  • PGYTECH OneMo 2: this might be your ultimate backpack
  • DJI RS 3: Essential accessories for the best all-around gimbal stabilizer
15,288Fans
2,939Followers
51Followers
333Followers
6,170Subscribers
588Followers
54Subscribers
722Subscribers

Subscribe to Receive New Posts (Low-Traffic)

Check your inbox or spam folder to confirm your subscription.

START HERE TO GET YOUR GEAR AT THE B&H STORE

B&H Search Banner Small
B&H Photo - Video - Pro Audio

Advertisement
  • RECENT REVIEWS AT FOCUSPULLING

The Latest from Your RigShots

Follow FocusPulling (.com)'s board RigShots on Pinterest.
© Copyright 2015 by Zen Violence Films LLC, all rights reserved. To read the site privacy policy and ethics statement, click here.